
The full name of this site is “Satellite Observation: Observing Earth Observation satellites”. Usually, it is meant figuratively: the articles deal with the technical, commercial or political aspects of earth observation, not with advice about how to literally observe satellites. So for this article, let’s do exactly that instead. Let’s look at how artificial satellites can be seen and imaged.
One of the main reasons for looking into this is that it is a fun and relatively easy thing to do for amateur astronomers: it does not require a lot of expensive hardware, and it can be done even from extremely light-polluted areas. The other reason is that it is exactly the opposite of observing the Earth from a satellite: from a physics point of view it is very similar, so it gives a good overview of the challenges of Earth observation. In fact, it is even used to test satellites on the ground, by making them image satellites on orbit. So it can also give a hands-on experience and understanding in optics and imaging, which can be applied to Earth observation later.
The first thing to know about imaging satellites from the ground it that is quite hard: satellites are on a strict schedule, they move fast, and they are small, far-away objects. However, with a little bit of preparation, these challenges can be overcome. This article will go into the details of these challenges:
II. Dealing with the movement of the satellite in the sky
IV. A cost-effective imaging system for the ISS
I. Scheduling an observation
Orbital mechanics
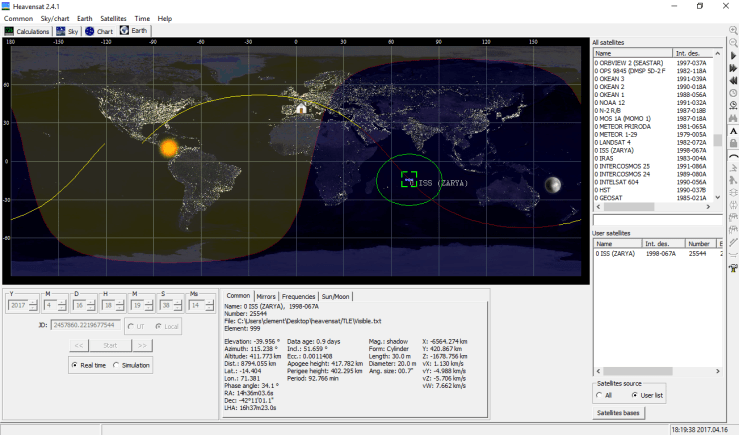
The strict schedule of satellites makes them a very occasional target: because of orbital mechanics, Low Earth Orbit satellites pass over an observation site at precise times, and the rest of the time they are below the horizon, so they are not visible. These pass times can be found on websites like n2yo, or the orbital elements of a satellite can be downloaded from the US Strategic Command, Celestrak or even Mike McCants’s website if you are interested in Western spy satellites. Once you have the orbital elements, software like heavensat or JSatTrack can give you the pass times, and nice visualization of the orbits and of the geometry of the observation.
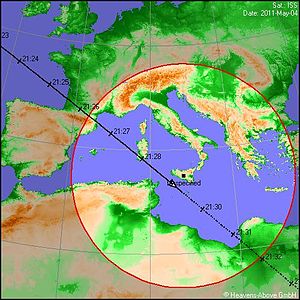
Several factors affect pass times: the inclination of the satellite’s orbit, for instance, makes it visible only to observers located at a lower latitude than the inclination. The height of the orbit also has an impact: a satellite flying low over the Earth’s surface will appear to be close to the horizon during most passes, making it hard to image. On the contrary, a high-flying satellite will often pass almost at the vertical of the observer, making it easier to observe. Finally, the type of the orbit also has a role to play: most Earth Observation satellites are on a sun-synchronous orbit (SSO), meaning they pass over a given site at always the same local time. By contrast, the International Space Station is not on a SSO, so the time it passes overhead changes each day.
Illumination
Once the list of pass times is available, the scheduling is not done yet: some passes are not exploitable due to illumination constraints. For an observer to see a satellite with the naked eye, the observer has to be in the dark, but the satellite has to be in sunlight. This means only passes shortly after sunset, or just before sunrise, are interesting. During those times, it is night-time for the observer so the sky is dark, and stars and satellites are visible. However, since the satellite is at higher altitude than the observer, it is already in daylight and so the light it reflects can be seen by the observer. Unfortunately, this makes observing SSO satellites very difficult: they usually pass at around local midnight and noon, which means either both the satellite and the observer are in sunlight, or none of them are. The orbit of the ISS makes it much easier to observe, especially around May:

Clouds
Finally, the weather usually plays tricks on observers: check the skys are clear before scheduling an observation, especially if there is a lot of hardware to setup.
These orbital mechanics, illumination and weather constraints are similar the the ones experienced by observation satellites imaging the ground: they can only do so at one point of their orbit, need the ground to be in sunlight (except for radar and infrared sensors), and need clear weather (except for radar sensors).
II. Dealing with movement
Even when a good pass can be found, the apparent movement of the satellite in the sky makes it hard to image. The first thing to do is to make a naked eye observation, or to use binoculars. This way, the pass prediction method can be checked, and it gives a first view of the object, its brightness and its velocity in the sky. The first naked-eye observation of the ISS (we will come back to it a lot) is an especially beautiful sight, as it is very bright.

This first pass, and the others that follow, will be a few minutes long at most for LEO satellites. In that short time, the satellite will rise from the horizon, pass directly overhead if the pass is well-chosen, and then sink to the opposite horizon. If the pass is not optimal, the satellite will rise to a lower elevation angle (directly overhead is 90° elevation). At maximum elevation, the satellite appears to move the fastest and thus is harder to follow through binoculars or any other instrument.
So in order to image the satellite with a camera for instance, the movement has to be dealt with. There are several ways to do this:
Fixed Pointing
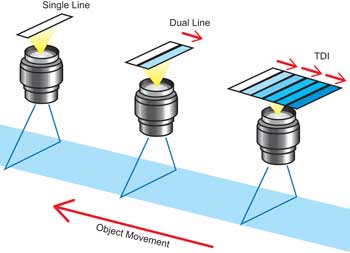
This is just pointing the instrument in a fixed direction and taking pictures during the short moment the satellite is in the field of view. In order to take high-resolution pictures of a satellite, a high level of zoom has to be used on the camera, which usually means the field of view is very small. So the camera has to be very precisely pointed, and the images taken at exactly the right moment. This will usually result in few images, and because the satellite is moving, it will appear blurry if a long exposure time is used. If short exposures are used, the quantity of light received by the camera will be limited, which means the image will be noisy with most cameras. Although this type of pointing is used by satellites to image the Earth (most point their telescope in one fixed direction and let the Earth drift in their field of view), they can get away with it because they have a specialized system (called Time-Delay Integration) in their sensors, which eliminates the motion blur even with long exposure times. General-use cameras and sensors do not have this, so the movement has to be compensated with another method.
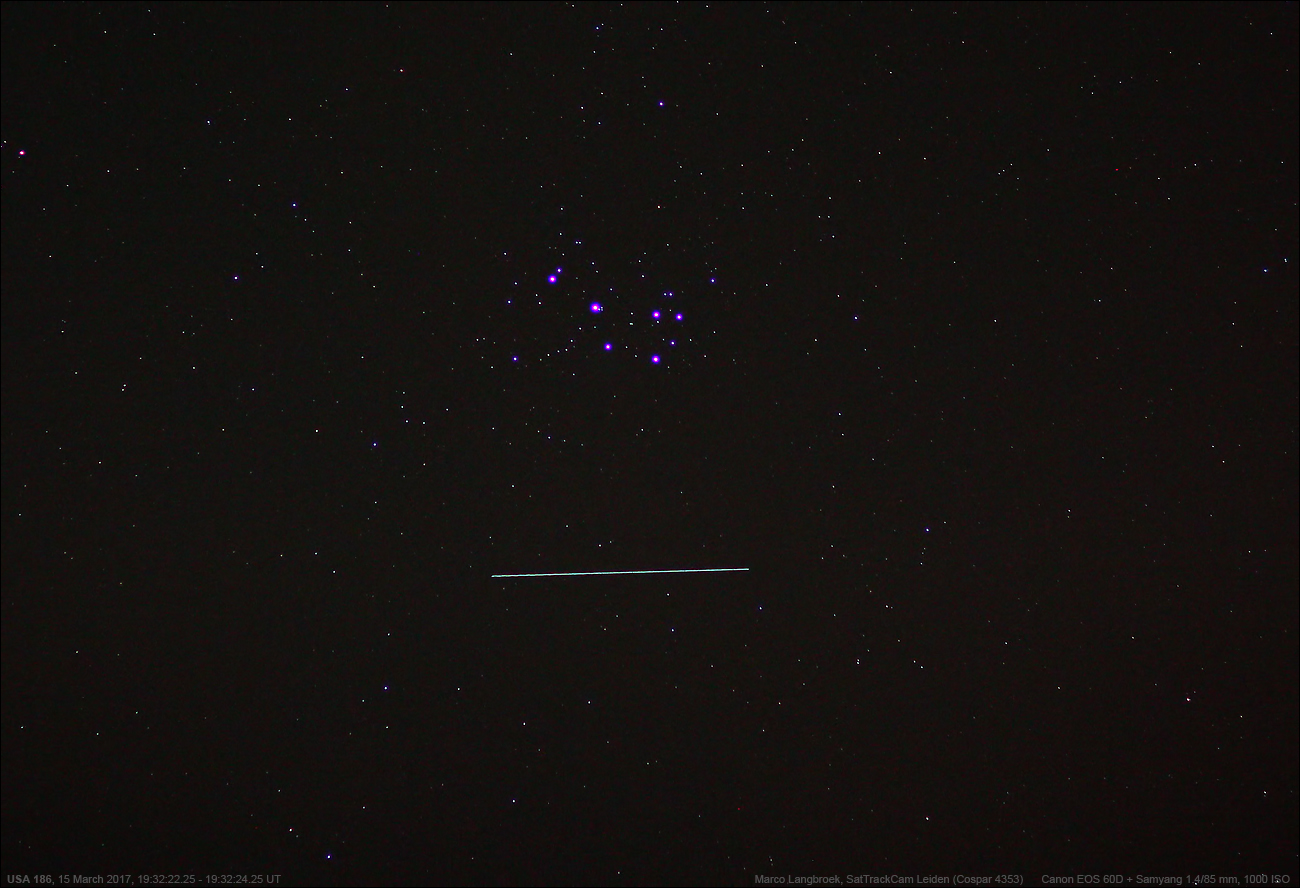
Fixed-pointing imaging also can be done with wide field of view cameras, in order to detect satellites in low Earth orbit and find their precise orbit. This is done for instance by the members of the Seesat-L network, who keep track of Western spy satellites that way. They even have a nice webpage explaining how to observe and compute the orbits yourself, and giving advice on how to to observations. They use images like the one below by Marco Langbroek (Source), and with accurate timekeeping and multiple observations they can accurately predict the orbits and the following passes of those satellites.
Manual tracking
This means the observer keeps the objective or the telescope pointed at the satellite, and thus the satellites remains in the field of view of the sensor for a long time. That way more images are acquired, hopefully with less motion blur, and without adding any tracking hardware to the instrument. This method is especially useful when imaging satellites with a Dobsonian telescope as this type of telescope is fully manually operated. With a little bit of training and the aid of a smaller spotting scope mounted on the main telescope, the telescope can be kept pointed on the satellites with relatively high accuracy.

However, keeping the object perfectly still in the field of view is impossible so the exposure time has to be kept relatively short. This also helps reduce the impact of the vibrations caused by moving the telescope around. Note that from the point of view of an Earth Observation satellite, vibrations are also an issue. They can occur, for instance, when the satellite is quickly repointed to image two areas of the ground in quick succession, and that is why these satellites must have rigid telescopes, which keep their shape in spite of accelerations, and must have pointing motors which cause a minimum of vibrations. The great advantage of manual tracking is that because the object stays in the field of view for a long time, many images can be acquired. Martin Lewis has a great tutorial on how to image the ISS with manual tracking and a Dobsonian telescope, with all the details on acquisition setup and image processing.
Motorized tracking
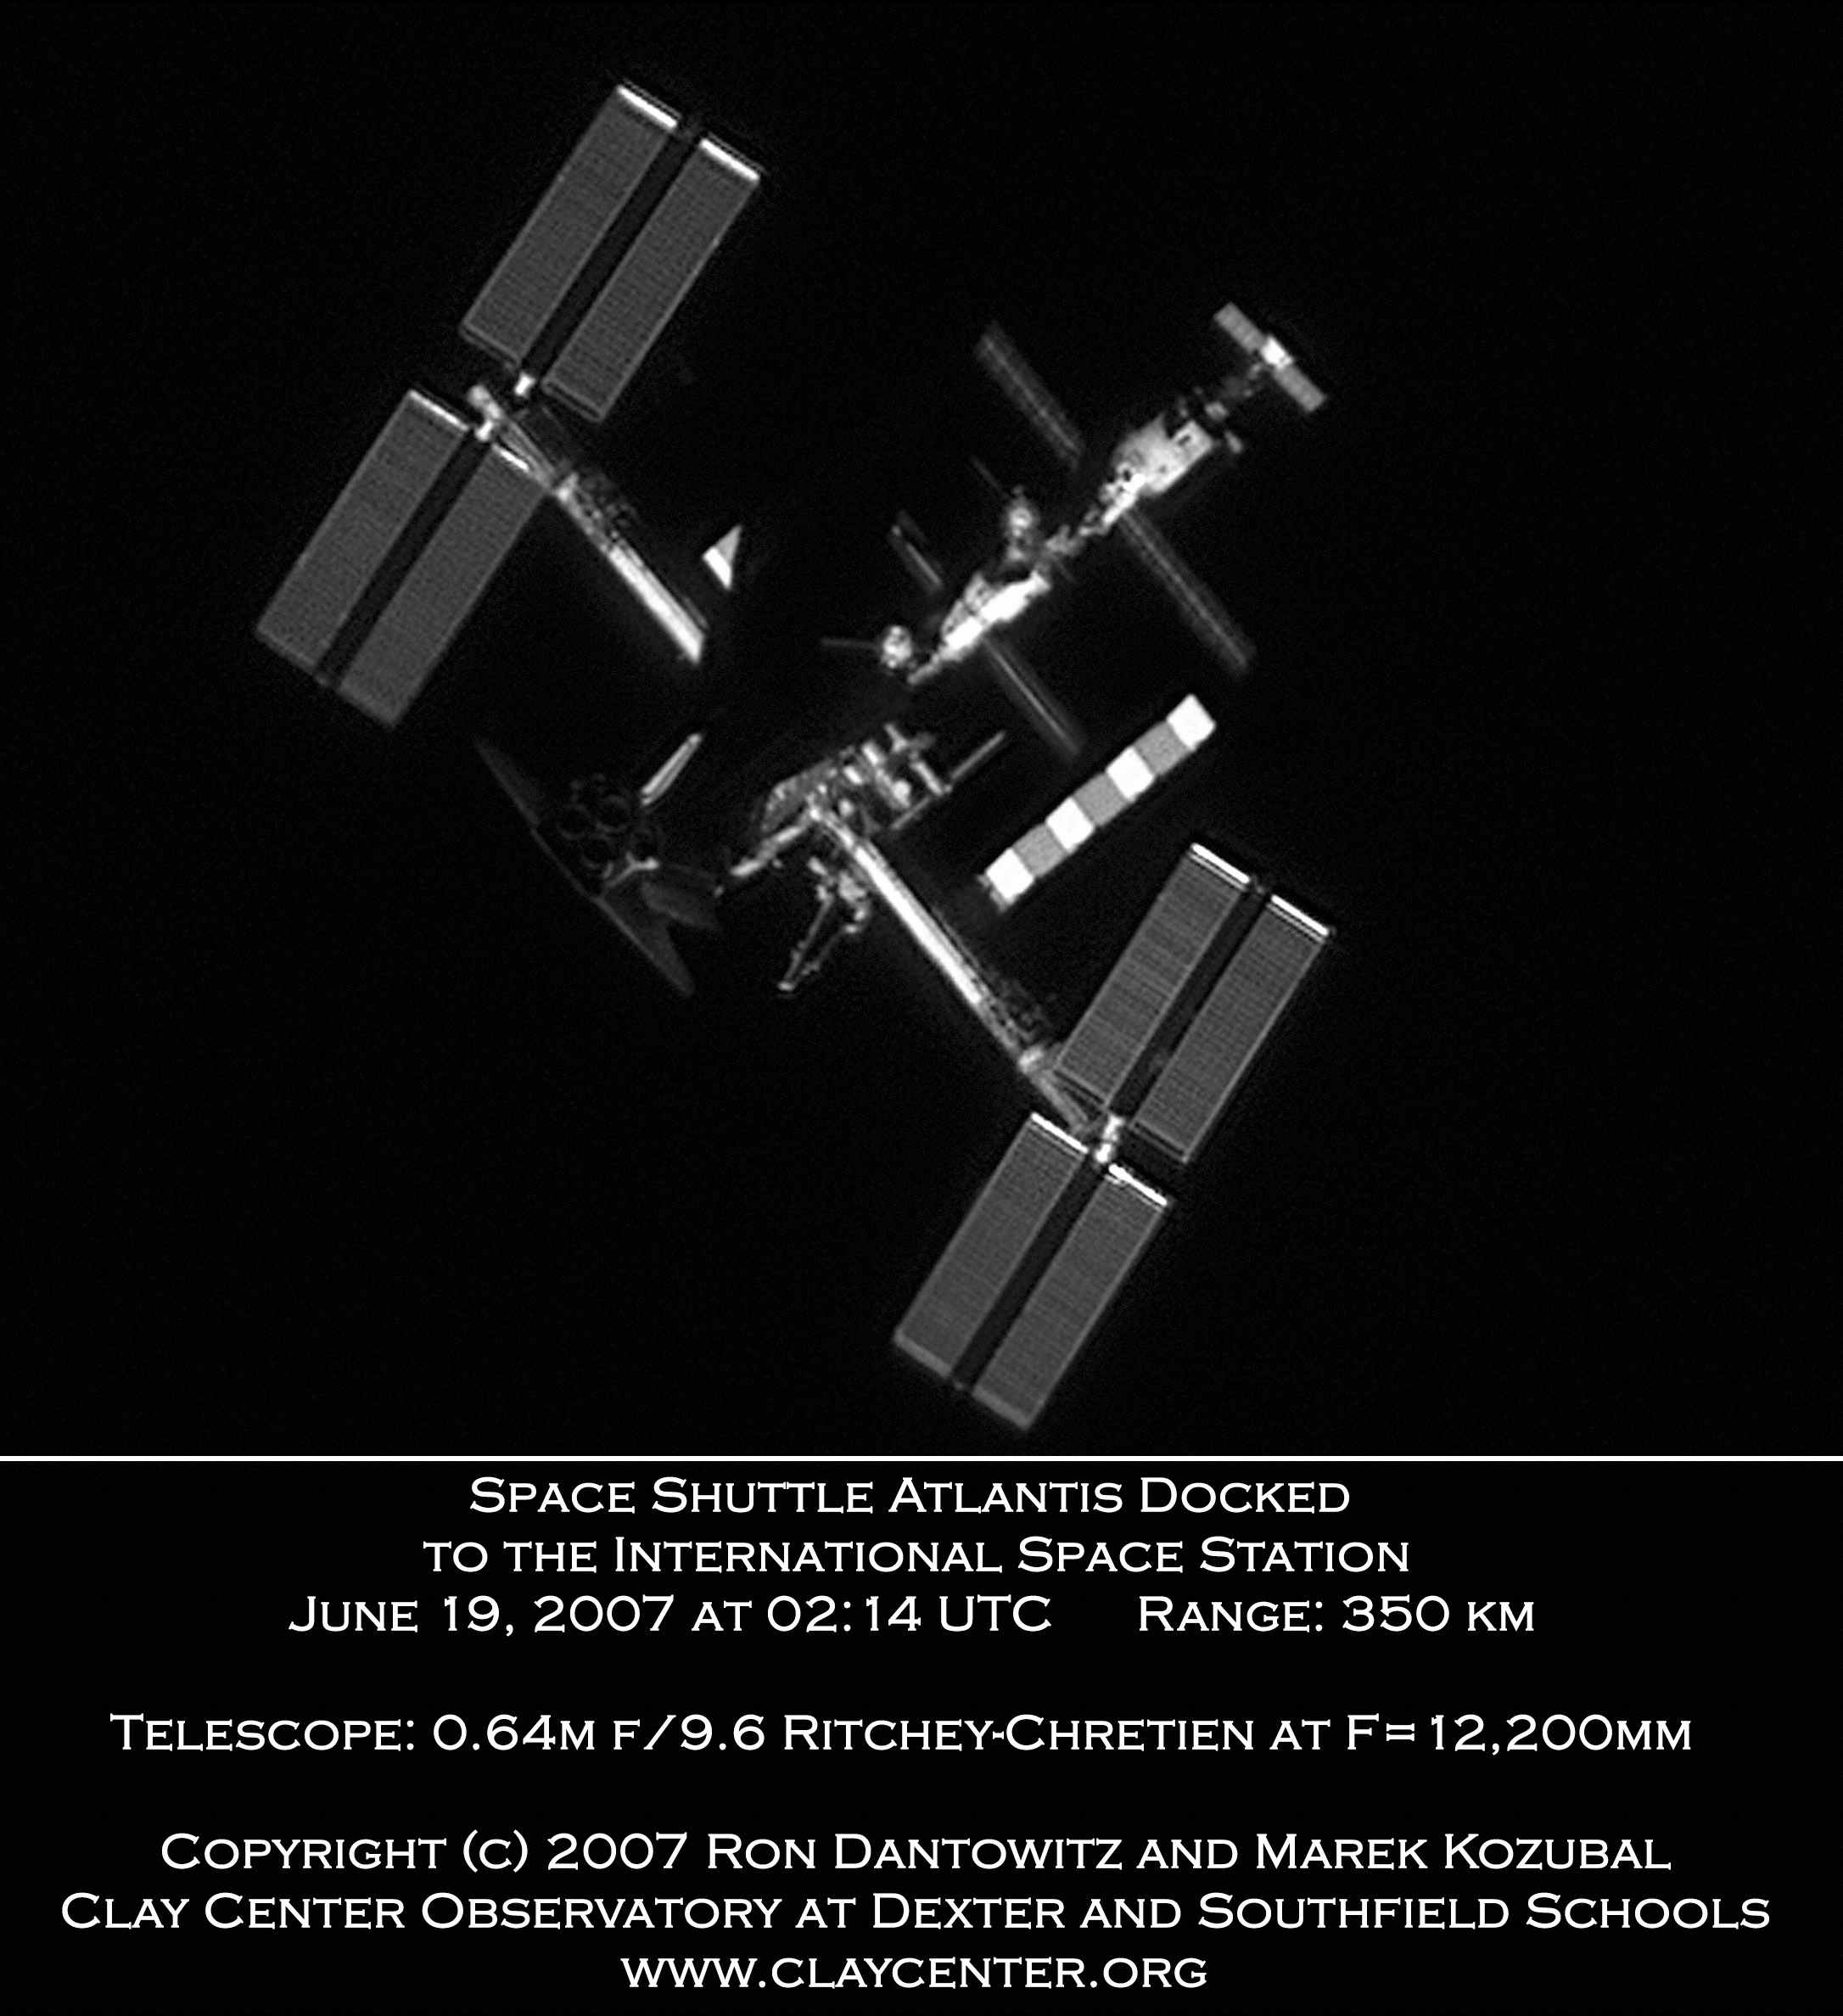
This requires that the camera or telescope is mounted on a motorized mount, and that a computer sends precise instructions to those motors to track the satellite, using its orbital elements for instance. This kind of system requires dedicated hardware, usually with a wide field of view telescope to acquire the target and keep the main, narrow field of view telescope pointed on it. Thierry Legault and Emmmanuel Rietsch have developed such a system, to keep a large 14-inches telescope continuously pointed at satellite. It gives great images of the Shuttle, the ISS and even individual astronauts. It even gives good images of spy satellites. Legault’s images are widely recognized as among best amateur images of the ISS, with Alessandro Bianconi being a close contender, apparently also with a 14″ telescope.

Others have set up similar automatic tracking systems:
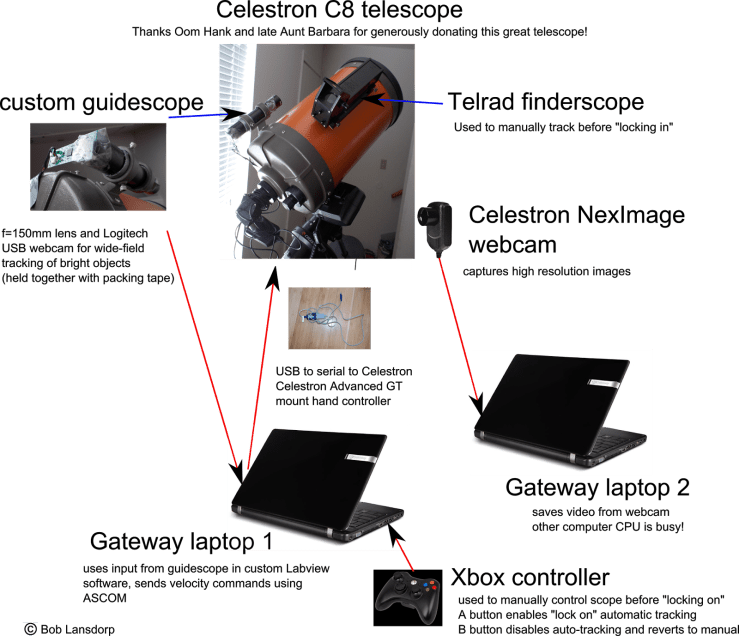
Automatic systems can keep the object almost perfectly centered in the field of view, which allows the use of very narrow field of view systems, and also eliminate the motion blur. A good system can also reduce vibrations in the telescope by using smooth movements for tracking, which is hard to do with a manual system. The downside of those systems is that they require a guiding mount with strong motors, which is not cheap. They also seems to require a PhD in robotics or electronics to be set up, which is a lot to ask. Nevertheless, it is the solution used by professionals, such as the Russian Altay Optic-Laser Center or the USAF’s Starfire telescope, to image satellites. Those professional systems also use adaptive optics to compensate for the turbulence of the atmosphere (more details on that in the next part), which is unfortunately out of the price range of amateur observers.
Professional telescopes look like this, a far cry from the 400$ Dobson seen above:


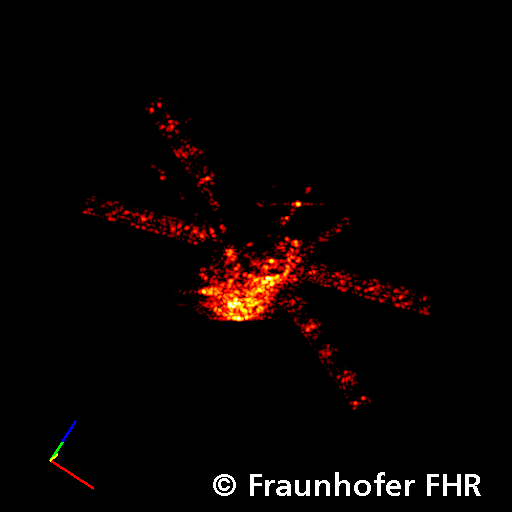
Radar can also be used to image satellites, using the same method as the Synthetic Aperture Radar (SAR) satellites. The ATV image at the top of this article was produced using a Germany SAR-Lupe satellite from the ground to image space. Germany also has a dedicated ground-based radar for satellite imaging, called TIRA (Tracking and Imaging RAdar). It produces very nice images:

The special case of GEO satellites
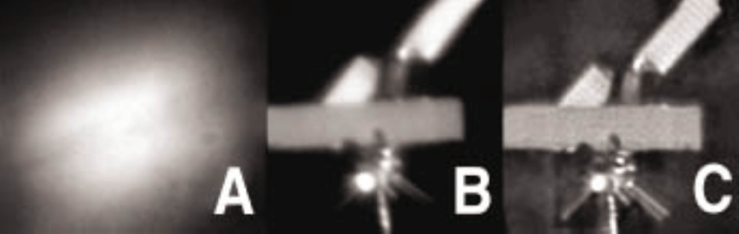
Satellites in geostationary orbit are an exception: since they appear fixed in the sky, a fixed pointing with an extremely long exposure time can be used. This allows for amazing videos such as this one (view in full-screen and look for the stationary dots in the top half):
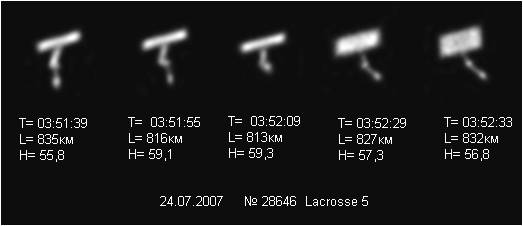
Marco Langbroek also has great images of the Geostationary belt such as the one below, taken with a DSLR camera, which enable him to locate and identify high-orbiting satellites, even the classified ones:

Jannne from r/astrophotography has also produced this wonderful image:

And has a labeled version with the names of the satellites.
III. Getting details on small objects
Satellites can be quite large, from a few meters to a hundred of meter for the ISS, but they orbit far away, at least 200km up. Consequently, they appear very small to an observer on the ground. To the naked eye, they are a small dot. With binoculars, this small dot can turn into a small square for the ISS, but details are hard to see. In order to get a photograph with small details, a few things have to be overcome
The diffraction limit
Physics is a harsh mistress and places a strict limit on what level of details an optical instrument can give. Basically, even a perfect telescope does not give a perfectly sharp image. There is always some amount of blur which is introduced by the instrument. This blur is called the Airy disk. For a perfect telescope, this amount of blur depends only on the size of the opening of the telescope (called its aperture). A telescope with a twice larger diameter will produce twice sharper images.
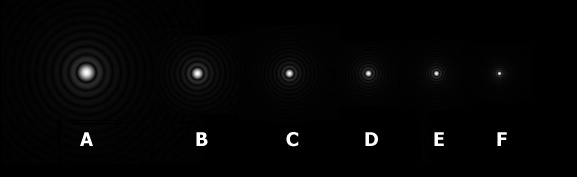
So in order to get fine details, a telescope with a large aperture is required. That is why no post-processing tricks can make an image taken with a consumer camera look as sharp and detailed as one taken by a large telescope. The diffraction limit places constraints on the optical part of the instrument: a given size is required to reach a certain level of sharpness. But it is not enough to reach sharp images. The electronic sensor of the instrument has to be carefully chosen too, because of physical limitations.
Sampling
In a digital optical instrument, light from an object is taken up by the aperture, concentrated and magnified by the optics, and then projected onto a sensor chip. This chip is made of a array of pixels. Each pixel measures the quantity of light falling on it, and outputs a number based on this.
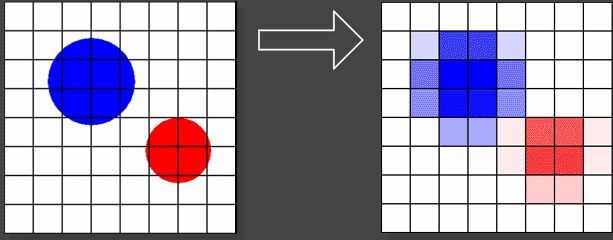
A digital image on the web or on your computer is just these numbers, displayed on a grid. Ideally, we would use infinitely small pixels, to get maximum details. However, this is not possible: pixels have to be manufacturable so they have a minimum size. As can be seen in the image above, pixel size has an impact on the image: details smaller than the pixel size are destroyed: in the digital image, all that remains are squares of the size of the pixel, with varying intensity. The curves of the circles have turned into blocky shapes. This seems to be a problem, but recall that in a real telescope, diffraction already introduces a blur in the image. This means the small details have already been blurred out, so there is no point using a pixel smaller than the smallest details remaining in the image. So the right size of the pixel depends on the size of the Airy disk on the sensor, which in turns depends on the aperture and on something called the focal length of the telescope, which describes how much it magnifies images.

The exact right ratio of the pixel size compared to the Airy disk is determined by the Nyquist criteria, displayed below:
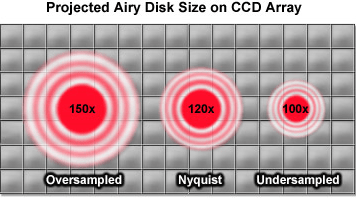
In practice for amateurs, the available pixel sizes are constrained by what is manufactured by sensor makers like Sony or Nikon, so one has to play with the focal length of the telescope to reach the Nyquist criteria. Designers of Earth observation satellites can order tailor-made sensors, so they choose the focal length so that the telescope is maximally compact and as sharp as diffraction allows, and adjust pixel size in function.
Noise
Noise is something we want to get rid of in images: it can make them aesthetically unappealing, or it can even hide important content if there is too much of it. That is why sensor manufacturers keep improving their technology, to remove it and make better images. Unfortunately, they can only deal with the noise that comes from the sensor itself, the electronic noise. Some sensors are so good they have virtually no electronic noise, but they still do not produce noise-free images. This is because light itself has noise.
In the quantum mechanics point of view, light is made of small particles called photons. Photons come in discrete numbers: there can be 0, 1, 2, 3, … photons, but not half a photon. So when the level only light is very low, when for instance, each pixel of a sensor receives half a photon on average, this means that some of the pixels receive 0 photons, some receive 1, of few of them receive 2, etc… This creates noise in the image because even though the signal should be uniform, quantum mechanics says it is not. This is called quantum noise, photon noise or shot noise.

The only way to get around quantum noise is to gather more light. There are several ways of doing this: increasing the aperture of the instrument -which comes at an exponential cost in optics-, increasing the interval of time the sensor receives light (the exposure time), which can create motion blur if the object moves, or taking many images with a short exposure time and adding them digitally (called stacking). The interest of stacking is that because it is a digital process, the position of the object in each image can be measured, and its movement compensated in post-processing. So it digitally creates a long exposure time, while not adding motion blur, which is very powerful. However, to make good use of it, the sensor has to be able to take many images per second, which puts constraints on the electronics of the sensor and on the downstream image transfer, storage and processing.
Noise is also a concern for satellites observing the ground: that is why they use TDI, which is a kind of image stacking done directly in the sensor.
Another impact of noise is that because the more photons the sensor receives, the less noise there is, a good instrument should not lose photons before they are converted to an electrical signal in the sensor. This is measured by the Quantum Efficiency of the instrument, which is ideally close to 100%, i.e. all photons are converted to a digital signal.
Turbulence
The air in the atmosphere is never completely still and uniform. Because of this, it deflects light rays and degrades the quality of telescope images by introducing additional blurring. This mostly concerns telescopes imaging from the ground towards the sky, because they are closer to the atmosphere so its effect is amplified. The impact of turbulence on the image is to add a blur which changes shape around 10 times per second, making it hard to compensate. It also impacts large telescope more strongly: At a scale of up to around 20 cm, the atmosphere is roughly constant and uniform, but at larger scales, it gets chaotic. This means small telescopes can almost always get as good images as the diffraction limits allows. Large telescopes however will get lucky sometimes and image up to their diffraction limit, but most of the time they will get images as sharp as a 20cm telescope. This is why large modern observatories have complex adaptive optics systems to compensate for the turbulence: otherwise, their very large mirrors would give them the sharpness of a much smaller telescope.

This means that most of the time and without adaptive optics, apertures larger than 20cm are not effective to increase sharpness, and only help in gathering more photons to reduce noise. However, if the sensor acquires images at least 10 times per second, it will sometimes capture an image in which the atmosphere was perfectly still and introduced no blur, making full use of the large aperture. This is called lucky imaging. Those lucky shots become less and less common as the aperture increases, so this method does not fully trump turbulence.
Telescopes in space and imaging space, like Hubble, are not affected by the atmosphere though, and do not need to compensate for it. That is why some optical telescopes are still sent to space to do astronomy, especially for wide field of view imaging, where adaptive optics no longer work.
Shutter mode
Since with fixed pointing or with manual tracking the sensor will image objects with a lot of movement, it should not distort the shape of moving objects. This means the sensor should expose all its pixels at the same time. Otherwise distortions can occur, which make it harder to stack images:
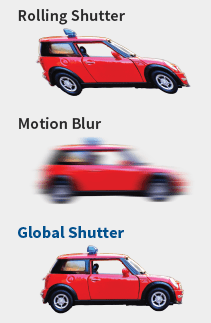
So a sensor with a global shutter should be preferred. It has to be noted that at least one type of Earth observation satellites is using sensors with global shutter, and not TDI: the Skysats from Skybox are using 2D-sensors with global shutter. They take a series of image of the same scene, and then stack them to reduce noise.
Other considerations regarding the optical design of the telescope can be taken into account: a telescope with mirrors will have less light distortion than one with lenses, a compact, thermally stable, rigid design should be preferred to reduce vibrations, and because we want to image with a relatively large field of view, the image should be sharp all over the sensor. These aspects require a deep dive into telescope design though, so for now they will be ignored.
IV. A cost-effective imaging system for the ISS
In the previous section, we saw the various drivers of image quality in an optical instrument. From them, an effective and cheap way of getting high-resolution images of the ISS can be derived.
- Motorized tracking is expensive and complex, so do not use it.
- Fixed pointing offers only a very short time to image objects at high magnification, so use manual tracking.
- Aperture should be as big as possible, but the bigger it is the more expensive the instrument, and above 10-20cm (depending on the location), atmospheric turbulence limits its impact. So a 10-20cm aperture telescope is a good way to go.
- 10-20cm aperture and manual tracking orient us towards a 4-8″ dobsonian telescope (price range 200-400$).
- A small finder scope to be fixed on the Dobson will help keep the ISS in the field of view.
- Regarding the sensor, it should be as high-speed as possible, with as many pixels as possible. It should output unprocessed pixels, as video compression can destroy the details on small, moving objects. Modern sensors provide pixel rates designed to saturate the widely available interfaces like USB3, so there is no easy way to cheaply get more pixels. They also have low electronic noise. A stand-alone sensor with a global shutter and an saturating the USB3 interface will to the job. The Sony Exmor IMX174 sensor is a good fit.
- Because of the pixel size of the sensor and the focal length of the telescope have already been chosen, an optical device called a barlow lens might be needed, to increase the focal length and reach the Nyquist criteria.
- Because the sensor outputs a lot of pixels that need to be stored for post-processing, it needs to be hooked to a computer with a high-speed storage drive, so a laptop with a SSD and USB3 is better. The other option is to to pre-processing on the fly during the acquisition to only keep the interesting part of the image and write only this to disk. The laptop is required for its portability.
If you already own the laptop, the total budget is around 1000€. Some parts can be replaced with cheaper alternatives: a DSLR or a smartphone could be used instead of the camera and the laptop, although with no guarantees on the results.
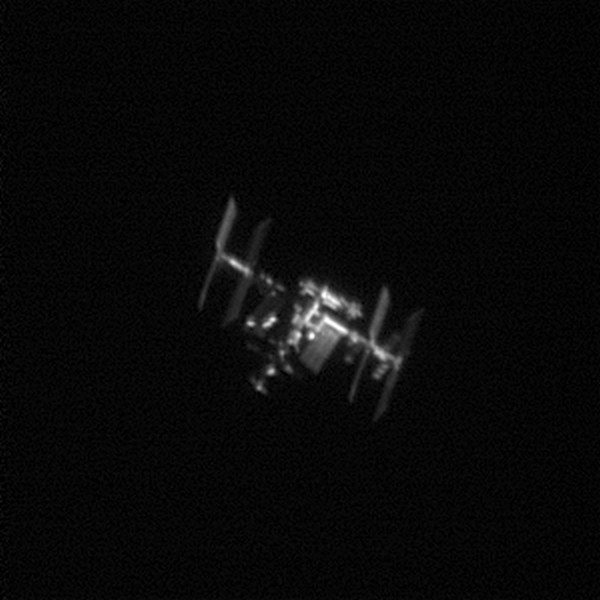
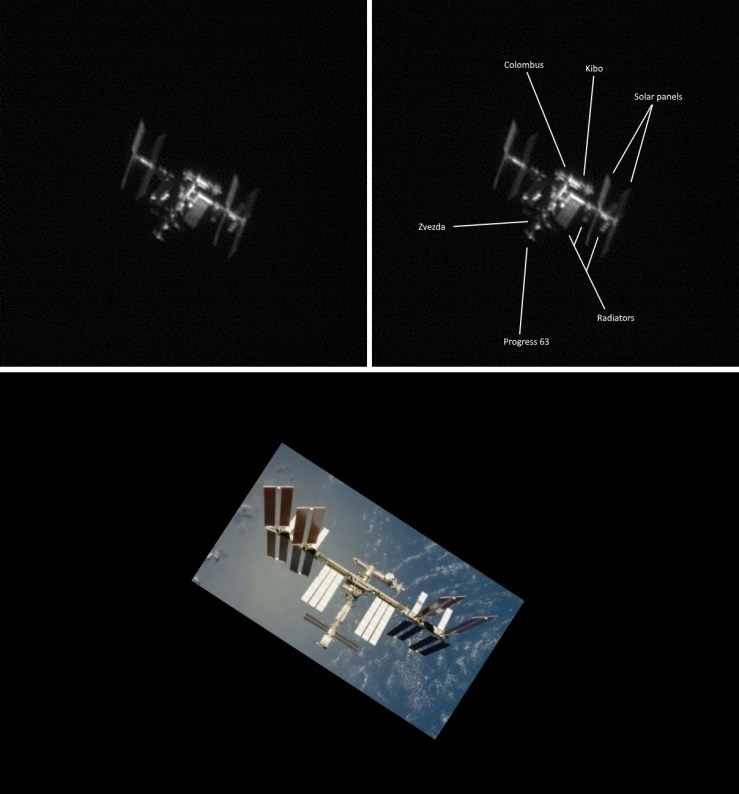
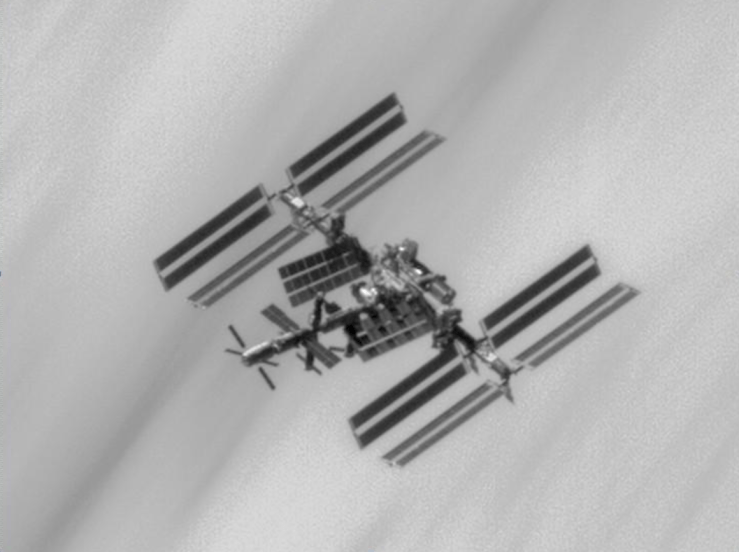
This kind of setup gives good results. This stacked and post-processed photo was done with a 8″ Orion XT8, an ASI 174MM camera, a 3x Barlow lens, a 6×50 finder scope and a laptop with USB3 and a Samsung 850 EVO SSD:
The post-processing was done with PIPP to resize the images and compensate the movement of the ISS, then the stacking, digital sharpening and zoom was done with Registax 6.
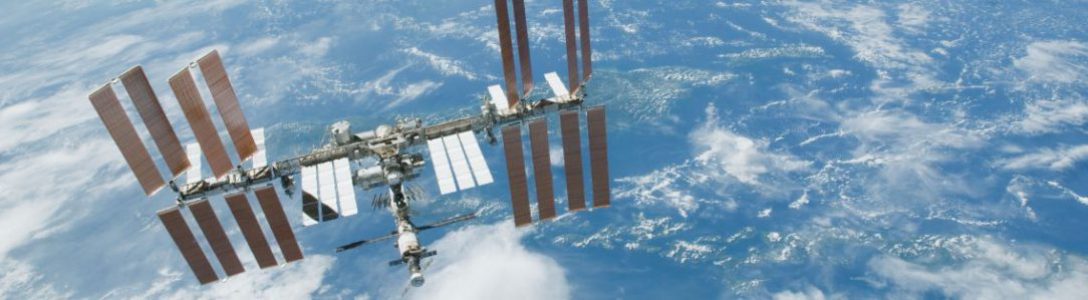
The different modules of the ISS can be seen, even the Progress resupply vessel:
Similar setups give also very nice results, such as this colour gif by Silwyna posted on r/astrophotography :

A simple DLSR camera with a long-focal-length objective can also give interesting results, although with less details.
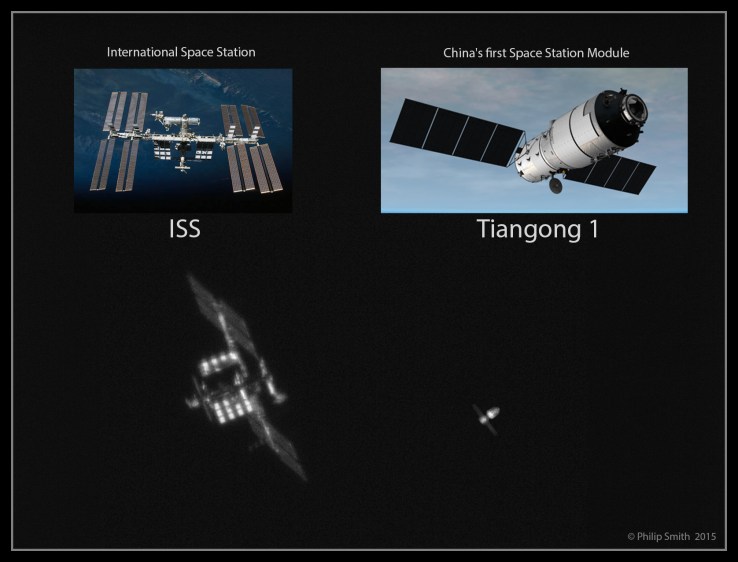
Other objects than the ISS can be imaged, but the ISS is the largest and most impressive: the next biggest objects are the Chinese space station Tiangong 1 and 2, but they are much smaller, as can be seen in these amazing composites by Philip Smith and Mariano Ribas:

The Chinese are planning a larger space station that will be more interesting to image. The Space Shuttle used to be a nice subject, as can be seen in Legault’s images, but it does not fly anymore. As for actually observing Earth Observation satellites, it is possible to try with the recommended setup but because they are even smaller, to get interesting images a larger telescope than a simple 8″ Dobson is required. Legault, using his 14″ motorized system, has very nice images of spy satellites, of an interplanetary probe, and of the Dragon and ATV resupply vehicles:
V. Conclusion
Imaging artificial satellites, and imaging the Earth from a satellite are very similar tasks. Regarding image acquisition, orbital mechanics, sunlight and cloud cover apply equal constraints on both. The physical laws on the propagation of light impose the same limits on the level of details on both, and although the optics and electronics used in an amateur telescope are orders of magnitude cheaper than those used in an Earth observation satellite, they are based on the same core technology. However, it is hard to find a satellite to play with, whereas taking pictures with a basic telescope is in reach of many, and is a great way to get acquainted with the same basic topics. It also opens the door to visual astronomy, which offers amazing sights of the planets.
On a final note, taking pictures of a satellite is possible not only from the ground, but also from another satellite, but that will probably be the subject of another article.

” Mike McCant’s website”
Mike’s name is McCants, so the possessive case is “McCants’s”
LikeLike